Author: nikitaskliarov66

  • Edwards Point Trail Guide: Hiking from Rainbow Lake to the Overlook

    Edwards Point Trail Guide: Hiking from Rainbow Lake to the Overlook

    I drove about two hours to hike Edwards Point from Rainbow Lake, and the hike itself took about two hours. That makes the obvious question hard to avoid: is the overlook worth that kind of drive?

    For me, mostly yes. The route has some annoyances: limited parking, a tucked-away trailhead in a residential part of Signal Mountain, a few confusing spots around Rainbow Lake, and an overlook that can feel crowded because there is not much room at the top. But the view over the Tennessee River Valley is strong enough that the hike still works, especially if you are already near Chattanooga or want a fall overlook hike with some variety.

    Trail stats and getting there

    My route from Rainbow Lake took about two hours of hiking, with a longer lake section on the way out and a shorter return past the dam and suspension bridge. Exact mileage depends on which lake option you take, so check your map before committing to the route. The trail gains a moderate amount of elevation overall, featuring some steep sections after the lake and a more plateau-like feel as you near the top. The hike is classified as moderate in difficulty, with a few stretches that will noticeably slow your pace. Parking is limited to the Rainbow Lake lot, which is small and tucked into a residential neighborhood on Signal Mountain.

    The Rainbow Lake section: which way to go

    How the hike begins: descent toward the lake

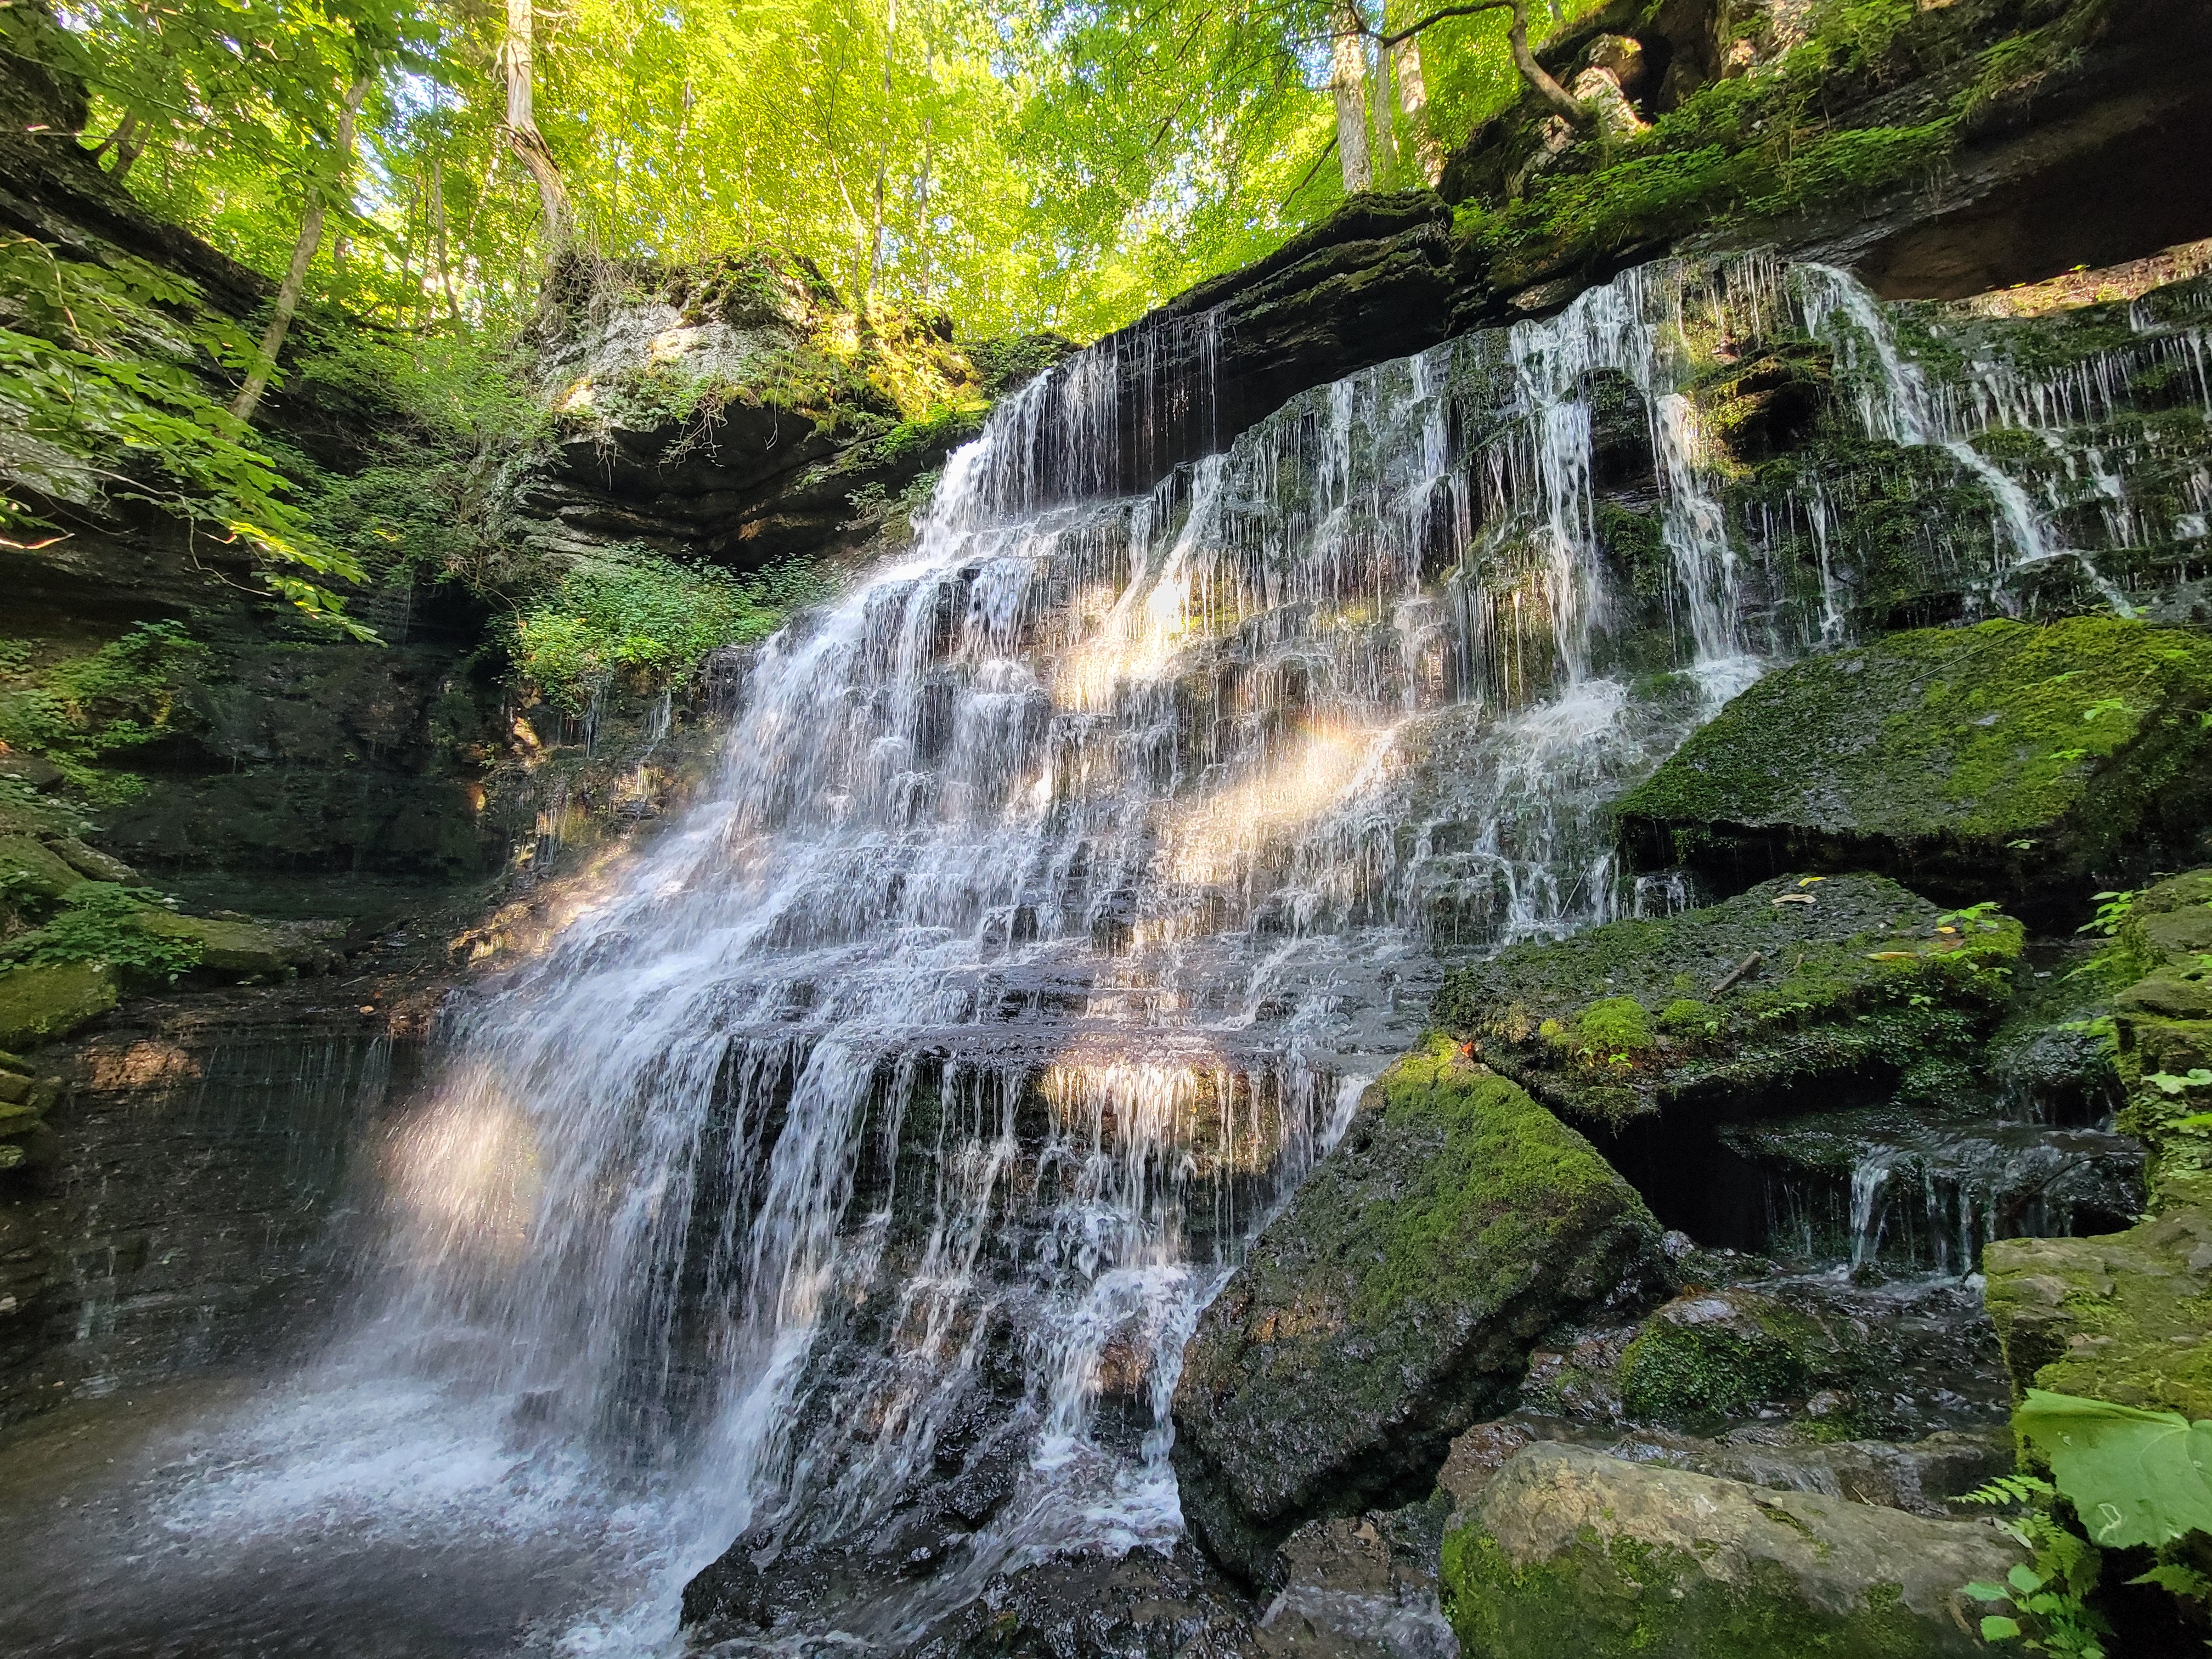
    The trail opens with a gradual descent toward Rainbow Lake. The wooded approach down to the water is pleasant, especially in October when the fall color is building. The canopy has good variety, and the descent feels gradual enough to ease into the hike rather than throw you into hard climbing right away.

    Left or right: the route decision at the lake

    Near Rainbow Lake, the trail splits. Going left is the shorter option; it skirts the dam and crosses a suspension bridge over Middle Creek. Going right adds under a mile, loops fully around the lake, and takes you over a different suspension bridge. I went the longer lakeside loop on the way there and returned via the shorter dam route. Take the longer route if you want the fuller lake section. Take the shorter route if your main goal is the overlook.

    Navigation note

    The trail is not clearly marked in a few spots along the lake section. I briefly got turned around after the suspension bridge before correcting course, and this is worth knowing so it doesn’t throw you off when it happens. Slow down and look at the map if you feel like you’re going in the wrong direction.

    The climb from the lake to the ridgeline

    Steep in places, then it opens up

    After the lake, the trail starts climbing, and some sections are steep enough to noticeably slow your pace. The terrain is rocky and rooted in places, which is typical for this part of the state. The reward for the climbing is that the trail gradually levels into something more plateau-like as you approach the upper section of Signal Mountain, and partial views through the treeline start appearing to hint at what’s ahead.

    The final approach to Edwards Point

    The last stretch before the overlook moves through wooded and brushy terrain, with glimpses of the Tennessee River Valley showing through the trees. After the navigation questions near Rainbow Lake, this section is more straightforward and easier to follow. The transition from brushy cover to open overlook is abrupt in the best possible way: there’s no long anticlimactic build, the view simply appears, and it’s very good. Light rain caught me on the return through this section, and the trail handled it without issue.

    What the Tennessee River Gorge overlook actually delivers

    The view at Edwards Point

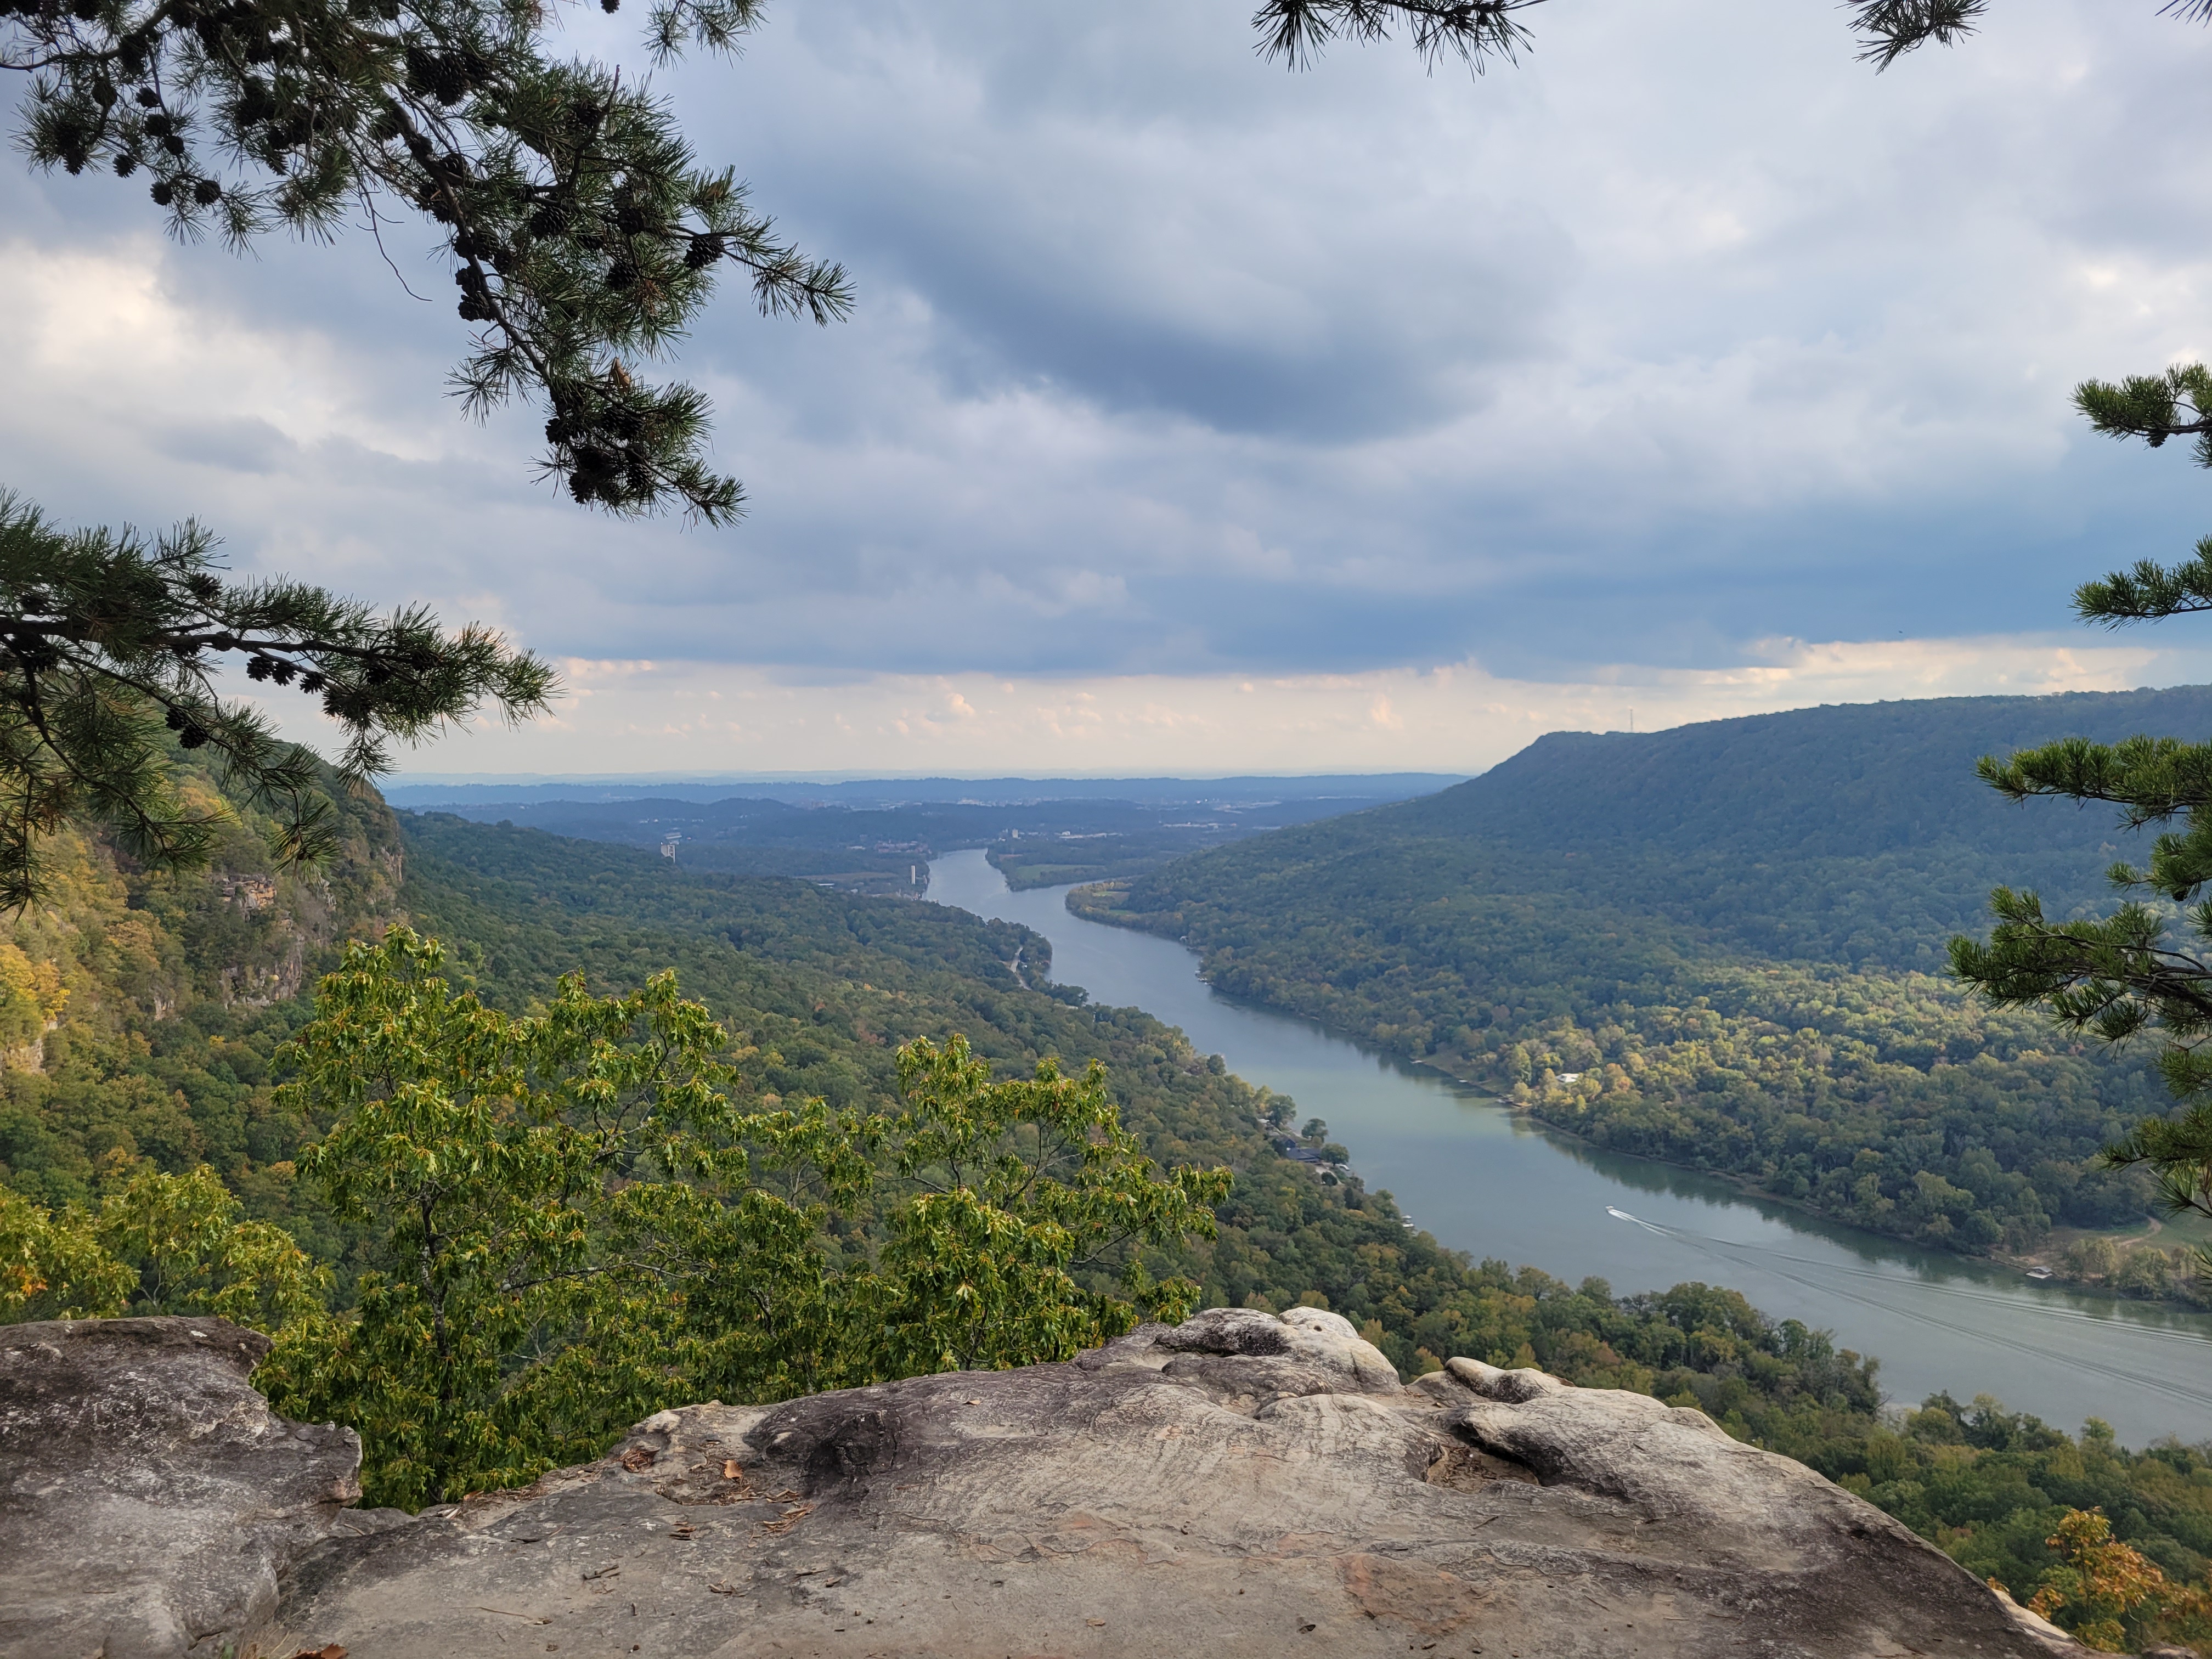
    The Edwards Point overlook gives a wide, open view over the Tennessee River Valley, with the gorge dropping sharply away beneath you and Chattanooga visible in the distance. It feels like a real overlook, not just a partial opening in the trees. When I arrived, several other hikers were already at the overlook taking photos, which gives you a realistic sense of the crowd dynamic on a good fall weekend.

    Managing expectations at the overlook

    The viewpoint is not large. It’s a natural rocky outcrop that can feel crowded on busy days, and you’ll be sharing it with a rotating group of hikers on weekends. That’s a minor thing, not a dealbreaker, but worth knowing if you’re expecting a quiet solo moment with the gorge.

    Best time to visit and what to bring

    When to hike the Edwards Point Trail

    Mid-October is a strong window. The fall foliage on the descent toward Rainbow Lake and along the lakeside section is at its best, and the temperatures are manageable for a hike with real climbing involved. Spring is also solid. Summer is doable, but the brushy final approach to the overlook feels more exposed in heat, and Signal Mountain can be warm and humid in July and August. Weekday mornings give you the best chance at a quiet overlook experience; fall weekends draw a crowd, especially when the color is peaking.

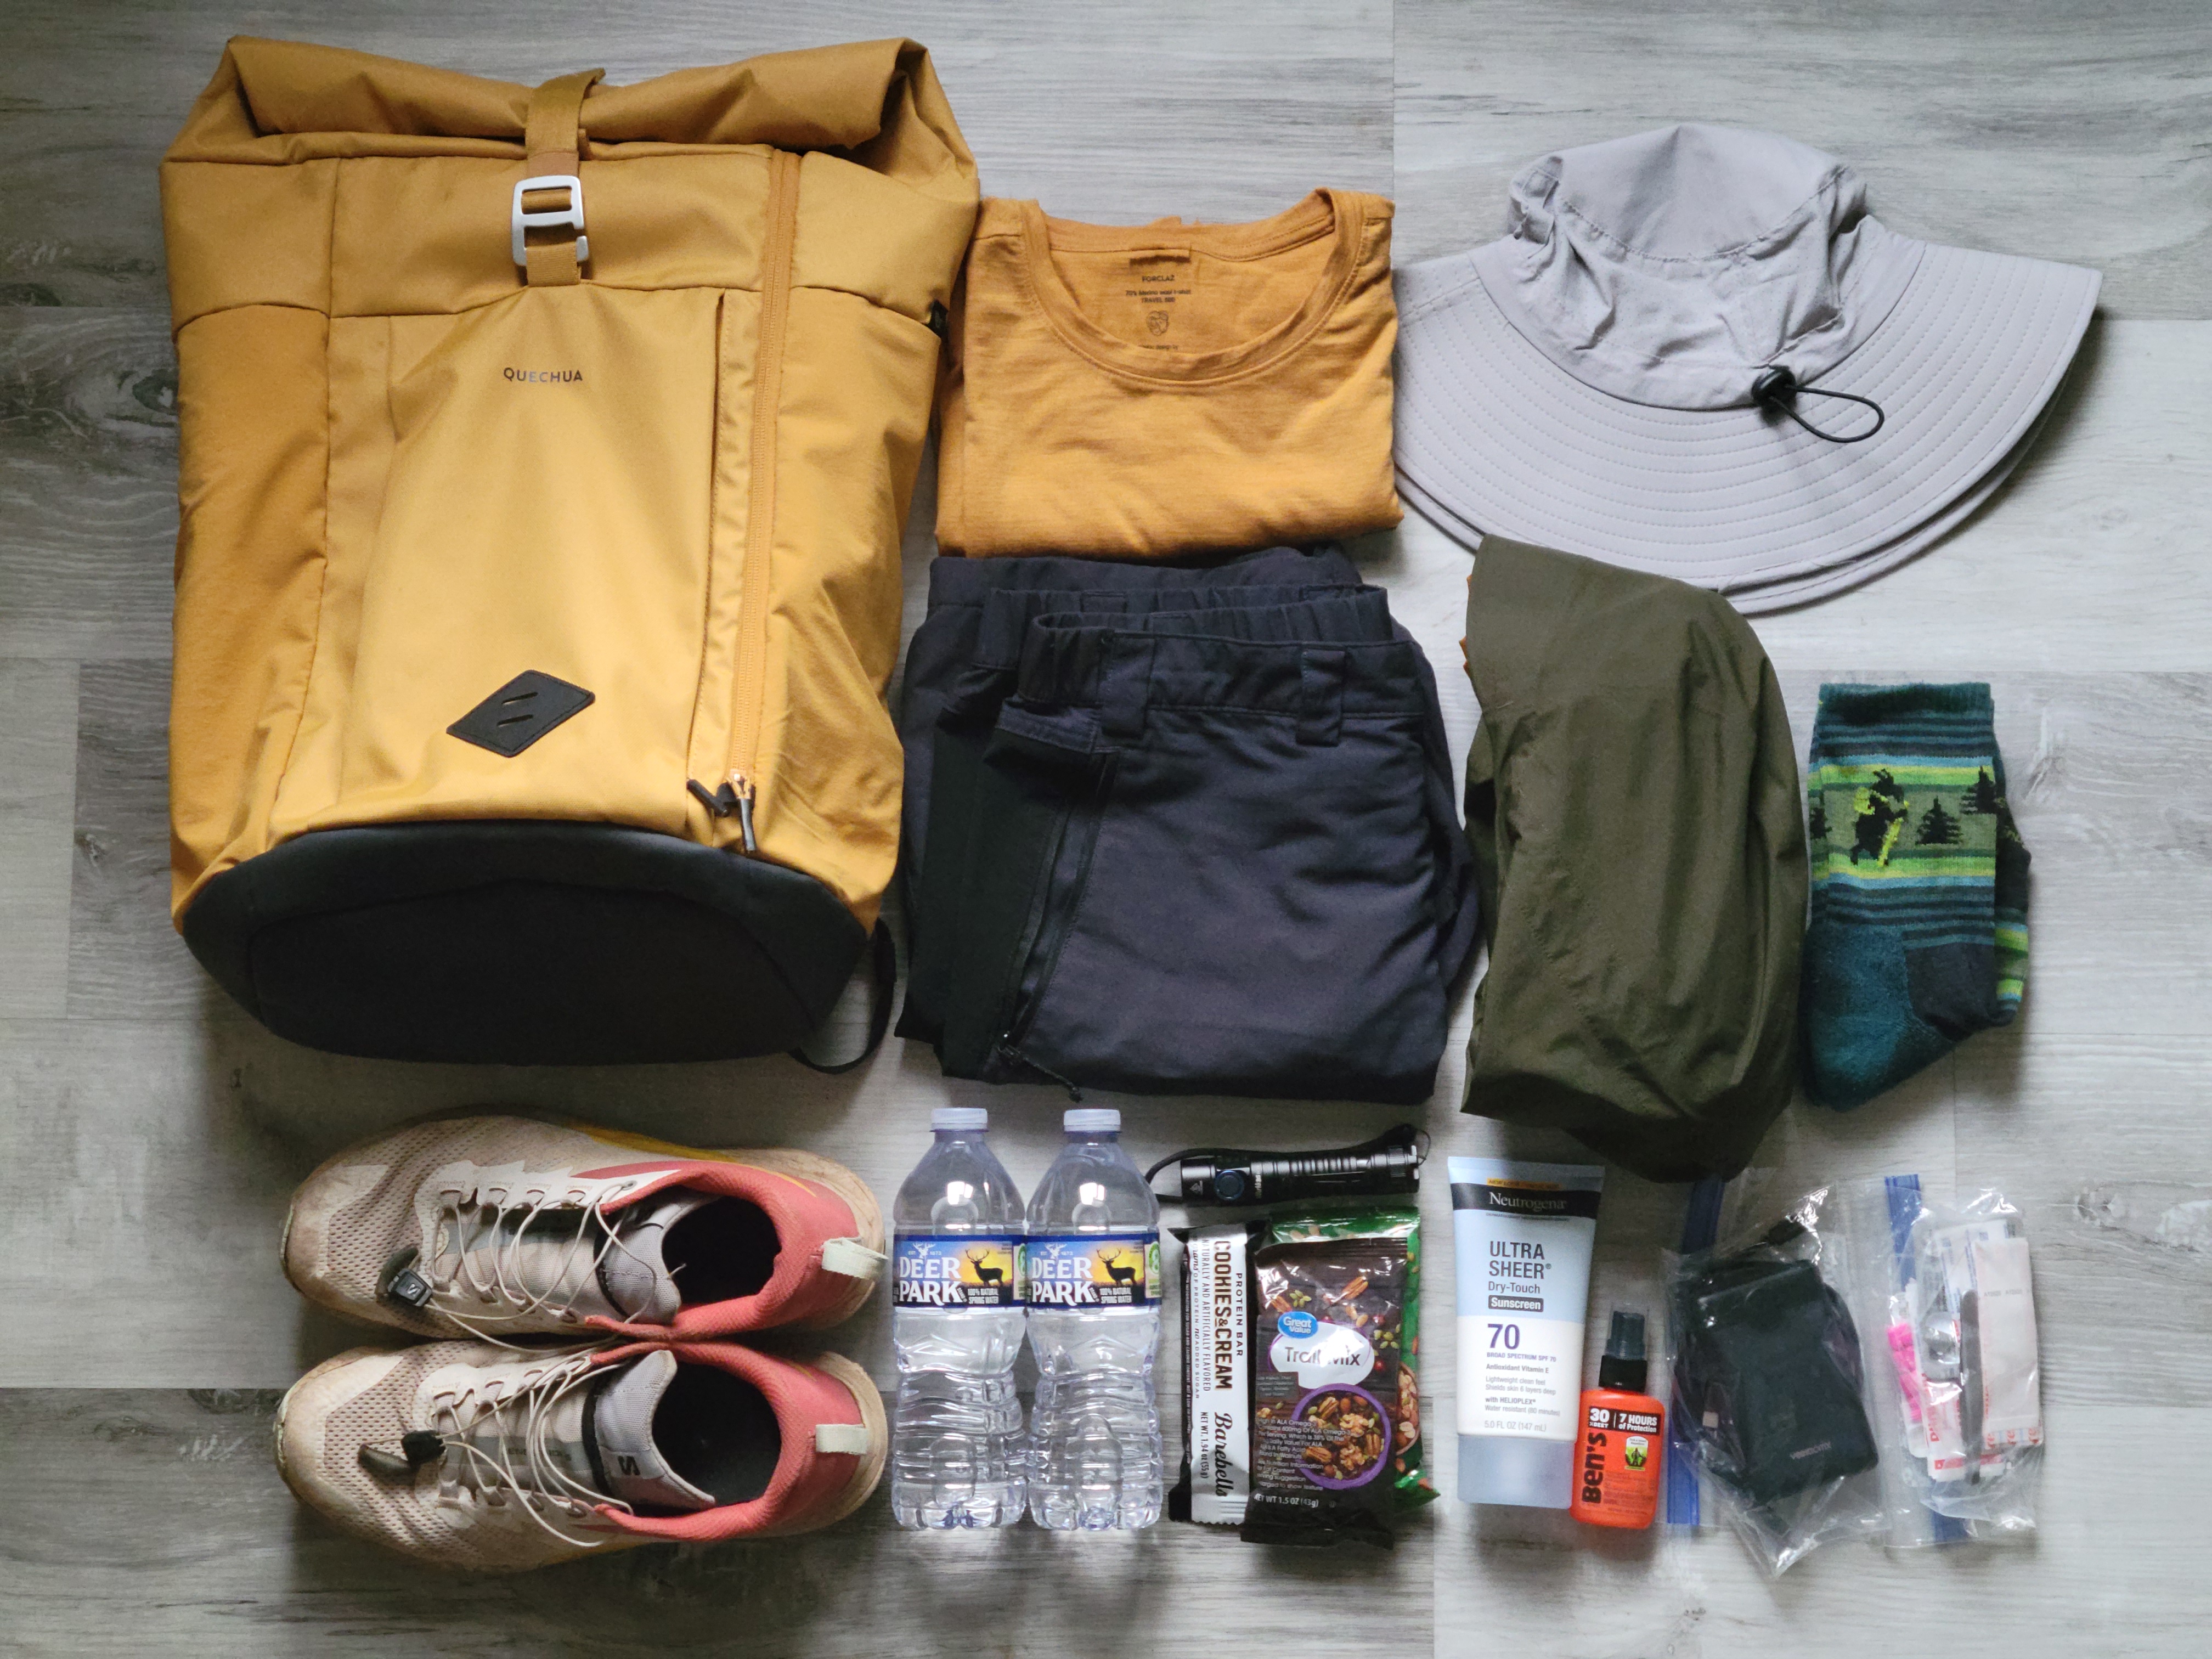
    What to pack for this hike

    • Water: at least 1 to 2 liters given the two hours of hiking and climbing involved; more in summer
    • Layers: weather on Signal Mountain shifts; I got lightly rained on during the return and regretted not bringing a layer
    • Sturdy shoes: the terrain after Rainbow Lake is uneven and rocky in sections
    • Change of clothes in the car: makes the drive home after a wet or muddy return considerably more comfortable

    Final notes for the Edwards Point Trail

    Edwards Point is worth doing if you want a strong overlook hike near Chattanooga, especially in fall. From Rainbow Lake, the route has some small annoyances: limited parking, some unclear spots around the lake, and a viewpoint that can feel crowded. But the payoff is real. If you take the longer lake option on the way out and return by the shorter route, the hike has enough variety to feel like more than just a walk to a viewpoint.

    For the route itself: take the right-side option at Rainbow Lake if this is your first visit. The fuller lake experience and the suspension bridge make it the more rewarding choice, and the added distance is modest. Download a map before you leave home, slow down in the spots near the lake, and give yourself a buffer on arrival time if you’re coming on a weekend.

  • What I Actually Bring on Tennessee Day Hikes in Summer

    What I Actually Bring on Tennessee Day Hikes in Summer

    In July, I hiked the roughly 9.5-mile Stone Door loop in Savage Gulf with just one 0.5-liter water bottle. I ran out around mile five with several miles still ahead of me. It wasn’t dangerous, but it was uncomfortable and completely preventable. That mistake is the reason water is first on my Tennessee summer day-hike checklist.

    Most of the hikes I write about on Ridgeline Field Notes are day hikes in Tennessee, and summer ones specifically have a way of making every gap in your kit visible. The heat, the humidity, the bugs, the afternoon storms that materialize without warning, it all adds up fast when you’ve underprepared. I’ve made enough mistakes on enough trails to have a clear sense of what actually matters.

    This isn’t a comprehensive gear manual. It’s the day hike packing list I’d actually put together before a summer hike in Tennessee, based on real experiences on real trails.

    Full day packing list

    Here’s what the full day-hike packing checklist looks like:

    • Water (scaled to distance and temperature)
    • Snacks or lunch
    • Trail shoes or trail runners with grip
    • Moisture-wicking shirt, pants or shorts, and socks
    • Hat
    • Sunscreen
    • Bug repellent
    • Packable rain jacket, rain poncho or compact umbrella
    • Offline map downloaded before leaving (plus paper map/compass for remote routes)
    • Phone and power bank
    • Headlamp or small flashlight
    • Compact first-aid kit with tweezers
    • Dry clothes in the car for after

    Day Hike Packing List: Core Kit for Tennessee Summers

    For most summer day hikes here, I don’t overthink the core kit. Water, snacks, a hat, sunglasses, sunscreen, bug repellent, trail shoes, a charged phone, and a power bank go in first. From there, I adjust based on distance, heat, terrain, and whether the route has creek crossings, exposed overlooks, or a long climb back out.

    The two items that earn their place despite feeling optional are a flashlight and a compact first-aid kit. Day hikes run long more often than expected. A slow pace, a missed turn, or just stopping longer than planned at a waterfall can push your return time past sunset. A headlamp or flashlight weighs almost nothing and completely eliminates that problem. The first-aid kit covers blisters, cuts, and bug-related issues: adhesive bandages, antiseptic wipes, ibuprofen, antihistamine, tweezers, and a small roll of medical tape.

    Tweezers pull double duty for ticks. Ticks are common enough on Tennessee summer trails that finding one after a hike isn’t unusual, so the tweezers aren’t a luxury item.

    Water and Food: What Nine Miles with One Bottle Taught Me

    How much water to carry

    The Stone Door loop in July heat taught me that water planning is essential. The trail isn’t technically difficult, but its canyon terrain around the Big Creek Rim stretches long and stays very humid through Tennessee summers. I now follow a simple rule: about 0.5 liters per hour in moderate conditions, up to 1 liter per hour when it’s hot and humid. For an 8 – 10 mile day hike, that means carrying at least 2 – 3 liters and starting early to avoid the midday heat.

    What to eat on the trail

    Food is less dramatic but still matters more than people plan for. On anything under three miles in mild conditions, a snack and water are enough, though even short hikes can run long, so pack a little extra if it’s hot or you’re with a slow group. On moderate 4 – 6 mile hikes, bring something that works as a real meal if the hike runs long. A sandwich, nuts, jerky, and fruit cover it without any complexity. The goal is not bonking on the back half of a trail that’s already draining your legs.

    What to Wear: The Machine Falls Jeans Situation

    At Machine Falls, I wore jeans on a humid July day and regretted it from the first step. Cotton holds sweat, gets heavy, and chafes, so now I stick to lightweight, moisture-wicking gear. Nothing technical or expensive required. The fabric just can’t be cotton. Add a hat as standard warm-weather gear.

    Footwear matters especially near waterfall destinations, which make up a large share of popular Tennessee day hikes. Flat-soled shoes and sandals struggle on wet rock and exposed roots. Trail shoes or trail runners with actual grip handle those surfaces reliably. They don’t need to be heavy or high-cut, just a sole with traction.

    Bugs, Rain, and Day Hike Safety Gear

    Summer trails in Tennessee move through wooded terrain with tall grass and dense brush, so encountering bugs and ticks is expected. Bug repellent applied before the hike, longer sleeves through dense sections, and a tick check at the car after, that routine handles most of it. The tweezers in the first-aid kit take care of anything that attaches.

    Tennessee summer afternoons can produce quick storms even when the morning starts clear. A packable rain jacket takes almost no space and eliminates a genuinely miserable outcome. Sunscreen matters more than most people plan for, especially on exposed ridges and open overlooks. Apply it before leaving the trailhead.

    Cell service can be unreliable on Tennessee trails, especially in canyons, creek corridors, and more remote parts of state parks. Downloading an offline map before you leave, through AllTrails, or even just Google Maps, reduces the navigation gap without adding any weight. That said, a paper map and compass remain the most reliable backup if your phone fails or battery dies, so consider them part of your day hike safety gear on longer or more remote routes. A power bank keeps the phone running long enough to actually use it. In my experience, these are the two simplest upgrades most casual hikers skip.

    How the Day Hike Packing List Changes Based on Distance

    Under 3 miles

    The kit gets lighter but never disappears. Water, grip footwear, a hat, and bug protection prevent the most common problems regardless of distance.

    Moderate 4, 6 mile hikes

    Add more water, real food, an offline map, and better clothing. The margin for error gets smaller when you’re farther from the trailhead.

    Harder 8, 10 mile days

    Carry 2 – 3 liters of water or more, additional food, a headlamp, and a rain layer. Start earlier than feels necessary to stay ahead of afternoon heat and storms.

    A Solid Kit Is Just Honest Planning

    A day hike packing list for a Tennessee summer doesn’t need to be complicated. It needs to be honest about the conditions: the heat, the humidity, the wet rocks, the ticks, and the afternoon storms that arrive without warning. Two hikes made that clearest for me. Running out of water on Stone Door and wearing jeans to Machine Falls both came down to small oversights that created real, avoidable discomfort.

    Treat this daypack checklist as a starting point. Adjust it as you learn your own habits and the specific trails you hike most. The goal is leaving the trailhead with nothing critical missing, and coming back having actually enjoyed the day rather than survived it.

  • Machine Falls Trail Guide: Short Loop vs. Full Short Springs Loop

    Machine Falls Trail Guide: Short Loop vs. Full Short Springs Loop

    Machine Falls is the reason to come to Short Springs Natural Area. The other trails here are fine, the forest is pleasant, and the secondary falls are worth seeing in the right season. But the waterfall itself is the whole point, and it delivers in a way that makes the drive feel entirely worth it.

    This is one of the first spots I visited, and one of a handful of places I have returned to more than once. Three visits across summer, winter, and spring, on slightly different routes. That kind of repeat attention says something about a place.

    This guide covers both the short Machine Falls hike and the longer combined route that adds Adams Falls, Busby Falls, and the Laurel Bluff Trail. The honest framing upfront: if your goal is the best waterfall view, the shorter route gets you there. The longer loop is more about extra walking than extra payoff.

    Trail stats and how to get there

    Short loop: approximately 1.5 miles. Full combined loop with Adams Falls, Busby Falls, and Laurel Bluff: approximately 3 miles total. No entry fee. Dogs allowed on leash. This Tennessee state natural area is just 10, 15 minutes from downtown Tullahoma.

    Parking is on Short Springs Road beside the water tower, with the trailhead directly across the street. A dozen or so spaces are available, which has been more than enough on my, admittedly off-peak, visits.

    Short loop or long loop: which one is right for you?

    The shorter loop

    The short loop clocks in around 1.5 miles and focuses almost entirely on the waterfall. The overall difficulty is low. The main obstacles are summer heat, the rooty and uneven creek approach near the falls, and a staircase section depending on your direction of travel. If Machine Falls is your goal, this is the version to do. It wastes no time on secondary falls with limited view or uncertain flow.

    The longer route: Adams Falls, Busby Falls, and Laurel Bluff

    The full extended loop adds roughly a mile to the short version without affecting technical difficulty. The route passes Adams Falls and Busby Falls, and portions of the Laurel Bluff Trail. Do the longer loop if you want a fuller day out, enjoy walking for its own sake, or are visiting during a wet season when secondary falls may actually have decent flow. Skip it if the main waterfall is your primary goal or if time and energy are limited.

    Clockwise vs counter-clockwise

    Counter-clockwise gives you a gentler descent to Machine Falls, but the return involves climbing the staircase at the end when your legs are already tired. Clockwise puts the stairs on the descent and the gradual slope on the return, making for an easier climb. Neither direction is dramatically harder than the other, but clockwise is my preference.

    Machine Falls up close

    From the wooden bridge to the base

    No matter which direction you approach from, the route passes a wooden bridge near Machine Falls Branch. From there, follow the right bank of the creek toward the falls. The footing on this stretch has exposed roots and uneven ground. Take your time here, especially after rain when everything is wet and slick.

    The best view of the falls

    The waterfall drops approximately 60 feet into a narrow gorge. When the light comes through the tree canopy in the right conditions, especially in spring with full flow, the view is striking. The signed observation area and the deck above do not give the best angle. The most impressive view is from lower in the creek bed, looking up at the falls.

    Only access the creek bed if water levels are reasonable, footing feels stable, and you are comfortable with the terrain. Signage in the area cautions against climbing near the falls due to steep drops and slippery rock; take those warnings seriously. In summer with lower water, it is sometimes possible to walk along the creek bed and return near the bridge. That depends entirely on conditions the day you visit, so read the water before you commit.

    Side exploration toward Normandy Lake

    On the opposite side of the wooden bridge from the falls access, you can follow the creek toward the beginning of Normandy Lake. It is a quiet stretch and feels secluded. I prefer it in winter when the undergrowth is down and the sightlines are open. One important note: do not try to climb back up to the main loop from this area. I attempted it and found no realistic route. Return to the bridge the way you came.

    Adams Falls, Busby Falls, and what the longer loop actually delivers

    Adams Falls: an honest winter report

    I visited Adams Falls in December and found it essentially dry, a faint trickle on damp rock. The trail is a pleasant forest walk that crosses a small stream a few times and has a quiet, unhurried feel. However, it almost doubles the distance for a payoff that is entirely dependent on recent rainfall and season. In wet months, it may be worth the detour. In dry season, you are walking a long way to look at damp stone.

    Busby Falls and the Laurel Bluff Trail

    Busby Falls is visible from the standard trail route, though the view is from above and the falls are relatively modest in scale. The overhead angle does not make a strong case on its own. The beginning of the Laurel Bluff Trail may offer a better viewing angle, but I have not completed that section in full, so I will not confirm that with certainty. It is worth noting as a possibility if you have energy to spare and are curious.

    Verdict on the longer section

    Do the extended loop only if you want extra walking, quieter woods, and more variety. If Machine Falls is your primary draw, the short loop is the right call.

    What to bring and seasonal notes

    What to bring

    • Trail shoes or boots with grip, particularly for the creek approach
    • Skip jeans, choose lightweight pants or shorts
    • Water and a snack if doing the long loop; the short version is manageable without much
    • Bug repellent in summer and spring; spiders were noticeable in April and insects pick up through the warmer months

    Seasonal notes

    Summer: Hot and humid. Insects and spider webs are active along the trail, especially on less-traveled stretches. Flow at the falls varies with rainfall. Wear breathable clothes and footwear with traction. Creek access near the falls is more appealing in heat if water levels allow it safely.

    Winter: Comfortable temperatures and very few people. The falls have less flow, and Adams Falls was dry in December on my visit. The woods are bare and open, with good sunlight reaching the forest floor. The side exploration toward Normandy Lake is best done in this season when the undergrowth is down.

    Spring: The best conditions for photography at the falls. Flow was strongest in April, the light through the fresh canopy was good, and the gorge looked the most impressive of any visit. More insects and spiders on the trail than winter, but the waterfall itself is worth it. Go clockwise and get down close to the water if conditions allow.

    Rutledge Falls nearby and the final verdict

    Rutledge Falls: a quick add-on

    Rutledge Falls is located a few miles before Short Springs Natural Area on the same road, near Rutledge Falls Baptist Church. It is a very short walk from the church parking area, not a hike in any traditional sense. The waterfall is attractive and, on warm days, feels like the kind of spot locals return to all summer. Worth a quick stop if you are already out on Short Springs Road, but treat it as a bonus rather than the reason to drive out.

    Final verdict

    Machine Falls is worth the trip. The waterfall rewards the effort, especially in spring with full flow and the right light coming through the trees. The gorge setting is one of the better waterfall experiences in the region, and it is accessible without a long or technical hike.

    The longer loop is fine, but it is not essential. Adams Falls and Busby Falls add variety, not a better payoff. Do the full loop if you want a longer walk and quieter woods. Skip it if you mainly came for the waterfall.

    If you are already in the area, Rutledge Falls is worth adding afterward. It is not much of a hike, but it is close, easy, and scenic enough to pair well with Machine Falls.

  • Stone Door Loop Trail Guide: What to Expect on One of Tennessee’s Best Hikes

    Stone Door Loop Trail Guide: What to Expect on One of Tennessee’s Best Hikes

    Some hikes earn the drive. Some don’t. The Stone Door trail loop through Savage Gulf is one of the few in Tennessee that really does. I’ve hiked in the Dolomites, the American Southwest, and the Pacific Northwest, so I’m not saying that lightly. The full loop here ranks among the best days I’ve had on a trail in Tennessee. It’s the kind of hike that pushed me to start writing field notes in the first place, because the generic trail databases don’t tell you what it actually feels like to climb out of a canyon at mile eight in July.

    Most people who visit the Stone Door area take the easy route: a flat, well-maintained 1-mile walk to the overlook and back. That hike is worth doing on its own. This guide covers the full Stone Door trail loop that most visitors skip, combining the Big Creek Gulf Trail, Big Creek Rim Trail, and Stone Door Trail into a hard, rewarding circuit. I hiked it on a July afternoon, starting at 3:30 p.m. and finishing just after 7:30. Because of that timing and the season, some of what I describe here is specific to summer conditions: a dry creekbed, significant heat, and an empty campground. Those things change. The canyon and the climb don’t.

    Trail stats and how to get there

    Here’s what you need to know before planning the hike. The Stone Door trail loop covers 9.5 miles total with 1,679 feet of elevation gain, rated hard. The trailhead is at the Stone Door Ranger Station near Beersheba Springs, Tennessee, in Savage Gulf State Park.

    Getting there was better than I expected. Once I got off the main roads, the drive turned into quiet country roads with some really nice views on the approach. I did lose about 30 minutes at a railroad crossing, which was on my regular route, so it had nothing to do with the trail itself. Still, it was a good reminder not to cut the timing too close, especially for a late-afternoon start.

    The parking lot has 45 spaces. It is shady, set back in the woods beside the ranger station, and was almost empty when I arrived. I also noticed a bear warning sign near the trailhead, which stood out right away.

    What to expect on the Stone Door trail

    The first mile and the critical route split

    The first stretch of trail is well-maintained and clearly signed. You’re on a paved surface for roughly the first 0.3 miles before it transitions to a natural surface. About a mile in, you hit the decision point that shapes your entire day: the trail splits left or right, and the direction you choose determines when you see what.

    Going right (counter-clockwise) puts the canyon descent and canyon floor in the middle of your day, with the Stone Door overlook arriving near the end. Going left (clockwise) brings you to Stone Door within the first minutes and sends you through the canyon and rim afterward. I went counter-clockwise. The Stone Door payoff near sunset was worth it, but the brutal elevation gain at the end of that route is something you need to know about going in. Clockwise distributes the climbing earlier when your legs are fresh. Counter-clockwise saves the most dramatic scenery for the finish. Neither choice is wrong, they’re just different days.

    Rim walking, canyon descent, and the climb that earns the views

    Counter-clockwise, you spend the first several miles on the rim. The walking is steady and manageable, with long canyon views opening up at clearings. The gulf drops roughly 600 feet below you, and on a clear day you can see deep into Savage Gulf from the rim edge.

    The descent into the canyon felt controlled on the day I hiked it, but the rocks near water demand attention. In July, the creek floor was mostly dry with one small flowing section and a modest waterfall worth a short pause. Algae-coated stone of the creek bed can be slippery, and the canyon floor requires more focus than the rim.

    Then comes the climb. About 600 feet of elevation gain are packed into a steady push near the end of the loop, and by that point you’ve already got roughly eight miles in your legs. It’s not technical, but taking a short break before the climb is not a bad idea.

    Stone Door overlook at the end

    Reaching the Great Stone Door overlook near sunset after the counter-clockwise route is a specific kind of satisfaction. The narrow break in the rock, with the steps dropping through it, is unique, and the canyon views below are even better in late-afternoon light. Very few people were on the trail that afternoon. The combination of solitude and the canyon view after a hard effort is exactly the kind of thing worth driving country roads for. I left the overlook at about 7pm, right around sunset, and then still had another half hour or so of walking back to the car. By that point my knees were hurting enough that the final stretch felt longer than it should have.

    What to bring on the Stone Door trail loop

    Water and food

    Carrying just a 0.5-liter bottle of water and a small bag of trail mix on a 9.5-mile July hike wasn’t enough, both were gone by the halfway mark. Untreated creek or stream water isn’t safe, and natural sources are unreliable or dry in summer. Pack at least 2 – 3 liters of water (I still wish I’d had an extra liter). What you bring in is all you’ve got. Also, bring a real lunch or substantial snacks. I was very glad to have a change of clothes and a turkey sandwich waiting at the car. That’s worth planning for specifically.

    Gear and what I’d do differently

    • Trekking poles make a real difference on the canyon exit climb, but a sturdy walking stick works too. Both are helpful on the ascent, the descent, and across the slick creek bed.
    • Trail shoes with solid grip are non-negotiable on the canyon floor. Algae makes rocks near water unpredictably slick regardless of how they look.
    • Sun protection matters on the rim sections, which are more exposed than the canyon floor.
    • A headlamp or a flashlight are worth packing if your start time is anything like mine. At 3:30 p.m. on a July day, I finished just before dark. Any slower pace and I’d have needed it.
    • This was also the only hike so far where I’ve picked up a tick. I did it in a T-shirt and shorts, and if I were doing it again in warm weather, I’d think more seriously about repellent and a bit more skin coverage. At minimum, it’s worth doing a quick tick check afterward.

    Best time to visit the Stone Door trail area

    What July actually looks like

    Hot, humid, and almost completely solitary. I was soaked through by the halfway mark. The creek was dry, the campground was empty, and I saw almost no one on the full 9.5-mile loop. If you can manage the heat and carry enough water, summer works fine. If heat plus humidity is a dealbreaker for you, skip July and August entirely.

    Spring and fall as the smarter windows

    Spring brings higher water levels to the canyon floor, which means the waterfall features are more dramatic and the scenery on the descent is considerably better than what I experienced in July. Fall brings lower humidity, better foliage color on the rim, and more comfortable conditions for the final climb. Both seasons are genuinely well-suited for this loop. Spring is the best season for anyone prioritizing canyon water flow; fall is the best for overall comfort and color. Winter is possible in dry weather, but the wet-rock hazard on the canyon floor and the exposed rim sections deserve real respect.

    A note on time of day

    Starting late in the afternoon offers moderate temperatures, solitude, and the chance to catch a stunning sunset at the end of the loop. It also adds pressure to return before dark, a hurried pace that led me to skip the Ranger Falls detour and navigate the drive home in fading light. An early morning departure will almost certainly mean cooler conditions but may bring more hikers on the trail, and finishing midday exposes you to higher heat and harsher lighting.

    Ranger Falls and Alum Gap Primitive Campground

    Ranger Falls: take the detour

    I skipped the Ranger Falls detour because it was getting late and I was watching the light. Looking back, I probably had enough time. It’s the clearest regret from the whole hike, and if I were doing the loop again, I’d plan for it from the start. It adds minimal distance and it’s one of the named highlights of the Savage Gulf trail system.

    Alum Gap Primitive Campground

    Alum Gap campground sits along the loop route and is available for backpackers who want to split this into an overnight trip. The setup is basic: pit toilets, a compact footprint, and in July, zero other campers. For a day hike, it’s just a waypoint. For anyone wanting to turn this into a two-day outing, it’s the obvious and only reasonable camping option on the route. The setting felt a little cramped for its surroundings, but it’s functional, and sits right in the center of the trail system, giving easy access to Ranger Falls, Greeter Falls, and the Stone Door itself.

    Final verdict: who this hike is for

    This loop is built for fit, experienced day hikers who want a hard half-day effort with real canyon payoff and genuine solitude. If you’ve done 8 to 10-mile loops before and know how to pace yourself on concentrated elevation gain, the Stone Door trail delivers exactly what it promises. The overlook near sunset with almost no one else around is the kind of finish that makes a hard effort feel like exactly the right decision.

    Beginners and anyone still building trail fitness should skip the full loop entirely. The out-and-back to the Stone Door overlook, roughly 2 miles round-trip from the ranger station, is a worthwhile hike on its own and a reasonable starting point for this area. Anyone who can’t carry sufficient water in summer heat, or who is starting after 2 p.m. without experience managing pace and light, should reconsider the full counter-clockwise route. The climb out of the canyon at the end is not where you want to discover your limits for the first time.

    Bring more water than you think you need. Take the Ranger Falls detour if you have the time. And if you want the strongest finish, do the loop counter-clockwise and hit Stone Door near the end. The climb back out is rough, but the payoff is worth it.